How to Read a Fish Finder Screen: Understanding Sonar for Beginners

Salem Hassan founded Travelcamp RV and brings 30+ years of hands-on RV, marine, and powersports retail experience to every review.
✎ Reviewed by Salem Hassan — Founder, Travelcamp RV · 30+ years in RV, marine, and powersports retail
Why trust us
TopBoatGear articles are researched by the Searchshop Editorial team using manufacturer specs, marine industry sources, and feedback from hands-on boaters. Our standard is saltwater first — if a product is not rated or proven for marine environments, we say so. We may earn a commission on qualifying purchases; it does not change what we recommend. If a product fails in saltwater, the article changes.
🛠 What you'll need
-
 Check Price on Amazon →Humminbird 411660-1 Helix 5 Chirp GPS G3 Fish Finder$309.99★★★★★ (448)
 -
 Check Price on Amazon →Fish Finder Underwater Fishing Camera: 5-Inch IPS Screen with 1500nit Brightness Long Battery Life 8000mAh USB Charging - IP68 Waterproof 98ft Cable for Ice Fishing Anglers$77.00★★★★★ (4)
 -
 Check Price on Amazon →Fish Finders -- How to turn your fish finder into a fish catching machine -- Buy It Now$8.97★★★★☆ (55)
 -
![The Ultimate Fish Finder Guide ★★★★★ [2023]: How to use your fish finder the right way & catch more fish then ever](https://m.media-amazon.com/images/I/61hGRUG-leL._AC_UY218_.jpg) Check Price on Amazon →The Ultimate Fish Finder Guide ★★★★★ [2023]: How to use your fish finder the right way & catch more fish then ever$17.00★★★★☆ (53)
Check Price on Amazon →The Ultimate Fish Finder Guide ★★★★★ [2023]: How to use your fish finder the right way & catch more fish then ever$17.00★★★★☆ (53)
How to Read a Fish Finder Screen: Understanding Sonar for Beginners
If you are learning how to read a fish finder screen, the good news is that most displays follow the same basic rules. Once we understand what sonar is showing, how the screen scrolls, and what fish, bait, weeds, and bottom structure look like, a fish finder becomes one of the most useful tools on the boat. In this guide, we will break it down in simple terms so beginners can spot real fish, avoid common mistakes, and choose a unit that is easy to learn.
Comparison Table

| Product | Best For | Screen Size | Sonar Features | GPS/Maps | Key Advantage |
|---|---|---|---|---|---|
| Garmin Striker Vivid 4cv | Small boats and kayaks | 4 in | CHIRP, ClearVü | GPS waypoint marking | Simple interface and vivid color palettes |
| Humminbird HELIX 5 CHIRP DI GPS G3 | Beginners who want mapping | 5 in | CHIRP, Down Imaging | GPS and base mapping | Strong balance of sonar and navigation |
| Lowrance Hook Reveal 5 SplitShot | Value-focused anglers | 5 in | CHIRP, DownScan | GPS on select versions | FishReveal helps combine views |
| Garmin Striker Vivid 7sv | Growing into advanced features | 7 in | CHIRP, SideVü, ClearVü | GPS waypoint marking | Larger screen with easier interpretation |
Key Takeaways
Quick summary:
- A fish finder screen shows sonar returns from right to left or left to right, with the newest information usually on the edge of the screen.
- Fish often appear as arches or dots, depending on speed, beam angle, and settings.
- Hard bottom returns are thicker and brighter; soft bottom appears thinner and less intense.
- Sensitivity, frequency, range, and chart speed have a major impact on what you see.
- Side imaging and down imaging help identify structure, but traditional 2D sonar is still the easiest place for beginners to start.
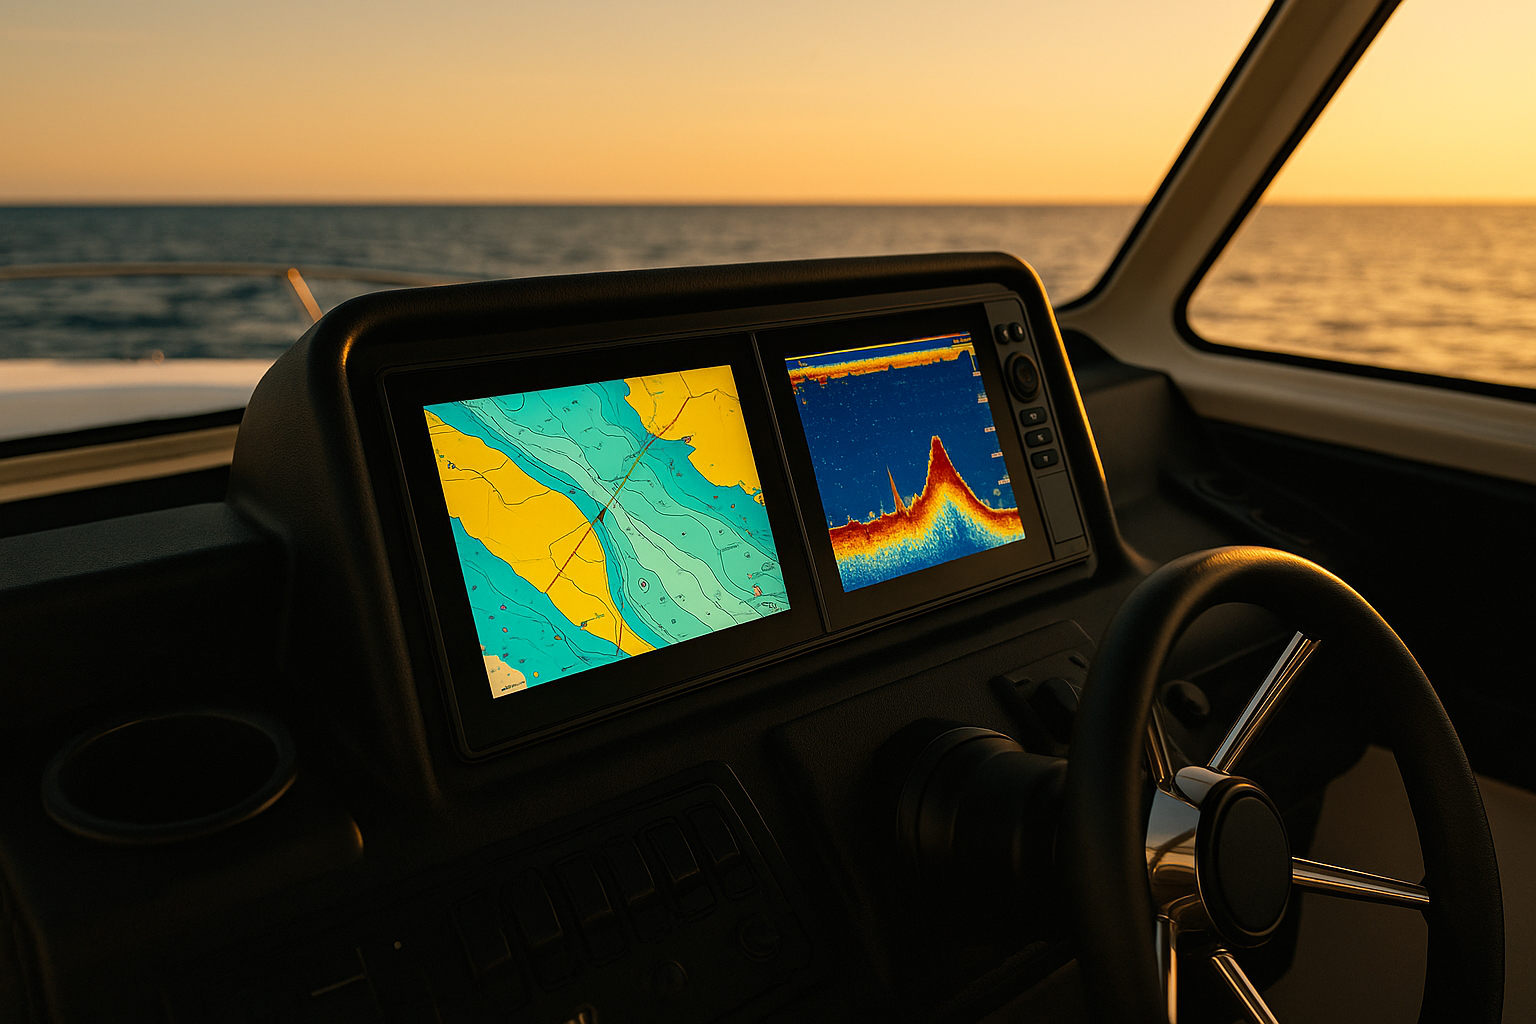
What a Fish Finder Screen Is Actually Showing

A fish finder does not show a live underwater video. It displays sonar echoes collected by the transducer and converts them into a moving picture over time. The newest sonar return usually appears on the far right side of the screen, while older data scrolls across the display.
That means when you see a fish arch, rock pile, or weed edge, you are looking at a record of what the transducer already passed over.
The Basic Screen Elements
Most fish finder screens include:
- Depth reading: Current water depth under the boat
- Water temperature: Useful for locating active fish patterns
- Bottom contour: The line or band showing the lake or seabed floor
- Sonar returns: Fish, bait, weeds, timber, and structure
- Range scale: The depth span shown on the screen
- Icons or arches: Depending on whether fish ID is turned on
Why the Screen Scrolls
Sonar works in pulses. The transducer sends a ping downward, receives the echo, and the unit draws that return on the screen. As the boat moves, the display builds a history of what was under you a moment ago.
How to Read the Most Common Sonar Signals
Learning the shapes is the fastest way to understand a fish finder.
Fish Arches
A classic fish arch appears when a fish moves through the sonar cone. As it enters the beam, the return is weaker. At the center of the cone, the return is strongest. As it exits, the return weakens again. That change creates an arch.
If you do not see full arches, do not worry. Fish can also appear as:
- Half arches
- Thick lines
- Dots or dashes
- Small bright marks near bait schools
This depends on boat speed, fish movement, transducer angle, and chart speed.
Bait Balls
Bait schools usually show up as cloud-like clusters or fuzzy masses. Predator fish may appear as larger marks around the edges or below the school.
Weeds and Grass
Vegetation often looks irregular and rises upward from the bottom. Thick weeds can create a jagged, textured area between the bottom and open water.
Timber and Brush
Standing timber and brush piles usually show vertical or branching shapes. On down imaging, they often appear more defined than on standard 2D sonar.
Bottom Hardness
A hard bottom generally appears:
- Thicker
- Brighter or darker, depending on color palette
- More sharply defined
A soft bottom usually appears:
- Thinner
- Less intense
- More muted around the edges
Some units also show a second return, which can suggest a harder bottom.
The Settings That Matter Most
Many beginners misread sonar because the settings are off, not because the unit is bad.
Sensitivity or Gain
Sensitivity controls how much detail the fish finder displays.
- Too low: Fish and bait may disappear
- Too high: The screen becomes cluttered with noise
We recommend starting on auto, then increasing sensitivity slightly until you see useful detail without excessive clutter.
Frequency
Different frequencies serve different purposes.
- High frequency: Better detail, usually shallower coverage
- Low frequency: Wider cone angle, often better for deeper water
- CHIRP sonar: Sweeps a range of frequencies for better target separation
For beginners, CHIRP is often the easiest to read.
Chart Speed
Chart speed controls how fast the screen scrolls.
- Match chart speed roughly to boat speed
- Too slow can compress returns
- Too fast can stretch them unnaturally
Depth Range
Auto range works well for many anglers, but manual range can make the display easier to interpret in consistent depths.
Fish ID Icons
Many units can replace sonar arches with fish symbols. While this looks simpler, it is often less accurate. We recommend learning to read arches and sonar returns instead of relying only on icons.
How to Read a Fish Finder Screen Step by Step
Follow these steps the next time you are on the water.
1. Mount and Check the Transducer Properly
Make sure the transducer is secure, level, and free from obstructions or aerated water.
Safety note: Always shut off the engine and secure the boat before adjusting transducers, wiring, or brackets near the stern.
2. Start in Auto Mode
Turn on the unit and begin with auto sensitivity, auto depth range, and standard CHIRP or 2D sonar.
This gives us a clean baseline before making changes.
3. Identify the Bottom First
Look for the continuous bottom line. Notice whether it is hard, soft, flat, sloping, or broken by structure.
If we cannot clearly identify the bottom, we should adjust sensitivity or transducer position before trying to locate fish.
4. Look for Structure Before Fish
Fish often relate to:
- Drop-offs n- Humps
- Weed edges
- Brush piles
- Rock piles
- Creek channels
Finding structure first makes fish marks more meaningful.
5. Spot Bait, Then Predator Fish
Search for cloudy bait schools and larger returns nearby. Game fish commonly hold above, below, or beside bait.
6. Fine-Tune Sensitivity and Chart Speed
Increase sensitivity gradually until detail improves. If the screen becomes too noisy, back it down slightly. Match chart speed to your boat movement.
7. Confirm With Multiple Passes
Make another pass over the same area. If the marks appear again in the same place, they are more likely to be real fish or structure instead of random noise.
Safety note: When making repeat passes, keep a safe distance from other boats, watch for shallow hazards, and avoid focusing so much on the screen that you lose situational awareness.
8. Use GPS and Waypoints
If your unit includes mapping, mark productive spots so you can return precisely.
Common Beginner Mistakes
Confusing Noise With Fish
Air bubbles, electrical interference, and excess sensitivity can create clutter that looks fishy but is not.
Relying Too Much on Fish Icons
Fish ID can mistake debris or structure for fish. Raw sonar is more reliable once we learn the basics.
Ignoring Boat Speed
A fast-moving boat can distort returns. If arches look strange, slow down and compare.
Forgetting That the Screen Shows History
The fish you see on the screen may already be behind the boat.
Buyers Guide: Beginner-Friendly Fish Finders
If you are still shopping, choosing a clear, easy-to-read unit makes learning much easier. We researched beginner-friendly models that offer good sonar, readable displays, and straightforward controls.
Product Pros and Cons
Garmin Striker Vivid 4cv
Pros:
- Easy menu system for beginners
- Vivid color palettes improve target visibility
- Compact and affordable
- Built-in GPS waypoint marking
Cons:
- Small screen limits split-screen viewing
- No full chart mapping
- Better for simple setups than advanced electronics networks
Humminbird HELIX 5 CHIRP DI GPS G3
Pros:
- Good screen clarity for the price
- Down Imaging helps identify structure
- GPS and mapping add navigation value
- User-friendly button controls
Cons:
- Learning curve is slightly steeper than ultra-basic units
- Five-inch screen can feel tight with multiple views
- Not as compact for very small kayaks
Lowrance Hook Reveal 5 SplitShot
Pros:
- Strong value for the features included
- FishReveal helps highlight fish around structure
- Good mix of traditional sonar and DownScan
- Straightforward setup
Cons:
- Interface can feel less intuitive to some beginners
- Screen size is still modest
- Mapping features vary by package
Garmin Striker Vivid 7sv
Pros:
- Larger display is easier to read at a glance
- SideVü and ClearVü add more detail
- Great upgrade path for beginners who want room to grow
- Clear sonar presentation
Cons:
- Higher price than entry-level models
- More features can mean more setup time
- Larger footprint may not suit every console or kayak
Which Type We Recommend for Beginners
If you only want to learn how to read a fish finder screen without spending too much, we recommend a 4- to 5-inch CHIRP unit with down imaging. That setup gives enough detail to learn fish, bait, and bottom structure without overwhelming the screen.
If your budget allows, a 7-inch display is much easier to interpret, especially when using split-screen sonar and mapping.
Safety Notes for Using Fish Finders on the Water
A fish finder helps us make better decisions, but it should never distract from safe boating.
Keep These Safety Rules in Mind
- Never stare at the screen while running at speed in crowded or shallow water
- Use charts, markers, and visual navigation, not sonar alone
- Shut down power before making electrical or transducer adjustments
- Secure cables to prevent tripping or accidental damage
- Remember that sonar does not replace a depth chart, lookout, or local knowledge
FAQ
1. What do fish look like on a fish finder screen?
Fish usually appear as arches on traditional 2D sonar, but they can also look like dots, dashes, or short lines depending on speed, beam angle, and settings.
2. Why am I not seeing fish arches?
You may be moving too fast, using the wrong chart speed, or the fish may not be passing cleanly through the sonar cone. Many real fish do not show perfect arches.
3. Should beginners use fish ID icons?
They can help at first, but we recommend learning raw sonar because icons are less accurate and can misidentify debris or structure.
4. What is the easiest fish finder setting for beginners?
Start with auto mode, CHIRP sonar, medium or auto sensitivity, and auto depth range. Then make small adjustments one at a time.
5. Is down imaging better than regular sonar?
Down imaging is excellent for structure detail, but traditional 2D sonar is often easier for beginners to understand when learning how fish appear in the water column.
Get your free Get Our Free Boat Gear Checklist
The essential marine gear list every boater should have before hitting the water.
Final Thoughts
Learning how to read a fish finder screen takes a little practice, but it gets easier quickly once we know what the unit is actually showing. Start by reading the bottom, then identify structure, bait, and finally fish. Keep your settings simple, make repeat passes, and avoid relying too heavily on fish icons.
For most beginners, a clear CHIRP fish finder with a readable screen and basic GPS is the best place to start. With the right setup and a little time on the water, sonar becomes less confusing and far more useful.